
Comfort and Safety Is Paramount
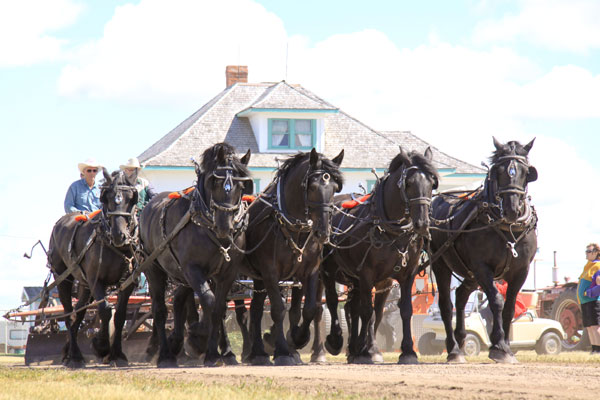
Fred McDiarmid (left) of Veteran, Alta., and Tom Wraight of Coronation driving their eight-horse hitch (4×4) of black Percherons on their antique road grader through the Horsepower Parade at Pioneer Acres, Irricana, Alta., in 2010. Both of these teamsters and their horses have been the subject of many great Western painters and photographers.
|
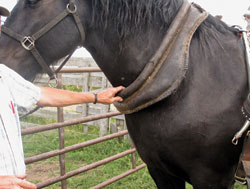
A good collar fit, it’s not squeezing the sides of the neck and it’s snug enough to be able to slip your fingers in between the collar and the horses windpipe, as shown
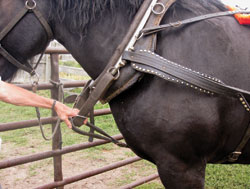
Proper adjustment of the quarter straps and martingale. The angle of the pole strap when pulled ahead must be in line with the hames.
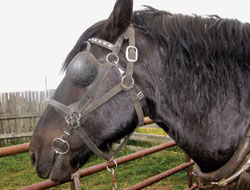
A well-fitted bridle. There is a crease in the top corner of the mouth, and the headstall is well back of the ears. The throat latch is slipped under the halter and then fastened in case the horse rubs off his bridle; this safety tip will prevent the horse from removing his bridle completely and you’ll still have control. |
The topic of fitting harness on a draft horse gives rise to many and varied opinions from teamsters. Having had many mentors and many years experience training young horses, I always harness with the comfort and safety of the horse and driver in mind. If horses have proper fitting collars, bridles and harness, they tend to drive better, to stand better and get into much less trouble.
THE HAMES should be adjusted to fit into the collar groove without squeezing or clamping the top of the collar, with the tug or line of draft at the point of the shoulder.
THE BELLY BAND does not need to be tight. It just holds the martingale up and keeps the harness in place.
THE BREECHING SEAT should be fairly high to the point of the hip so the hind legs don’t get pulled underneath on a steep downhill drive.
THE QUARTER STRAPS snapped onto the martingale ring are adjusted so the pole strap can be pulled out in direct line with the hames. I leave this adjustment slightly looser so when I stop, the horses can be pulled back about eight inches to a foot, the lines wrapped on a line peg, and if they unexpectedly start, they hit the bit before the tugs pull the load, thus they may not take off on you, especially if you are alone.
THE MARTINGALE bolted to the pole strap snap is a quick handy way to attach the neck yoke, but is not the best for the team holding back on a load. In this configuration the martingale pulls down on the collar and will scald a horse’s neck. The martingale should be taken off the snap and put over the neck yoke and a slide used on the pole strap where the ring wears. This puts the downhill holdback strain directly back to the horse’s hips with no pull on the collar.
THE BRIDLE is another important piece to fit properly. The bit should be high enough to crease the lips at the top of the mouth. The headstall should be back as far as possible to prevent the horse’s constantly working ears rubbing on it, or an improperly placed buckle. The brow bands are often too short on draft horse bridles, holding the headstall into the ears.
I LEAVE THE HALTERS ON for safety and put the throat latch under the halter where it attaches in case a bridle is rubbed off. On green horses, I cross tie the shank to the opposite pole strap rings and I also use a “cheater strap” about two feet long between the breeching seat rings to keep the team from turning inside out while backing up to the pole.
THE LINES should have the cross line five to six inches longer than the outside line. I don’t use spreaders but if you do, the cross line has to be adjusted back to keep the team nice and square. Buckles to the bits are the safest especially for parading in public areas, but if you use snaps always turn them in, this goes for the pole strap snap also.
THE LENGTHH OF THE NECK YOKE should be the same as the evener so the horse can walk straight and comfortable without any side pull on the collar. Another important tip is to make sure that the neck yoke cannot come off the pole accidentally. On steel poles, I weld two steel bars, top and bottom of the pole, protruding out five inches past the end of the pole, with a half-inch bolt at the end, to hold the neck yoke ring. That way, if a tug comes unhooked, the pole cannot fall and cause a wreck. Standard harness requires the distance from the evener pin to the neck yoke stop be 9 ft 6 in.
These methods of fitting harness are not set in stone, but have worked well for me, for training, farming and parading. Hopefully some of these guidelines will help novice teamsters safely enjoy their draft horses.
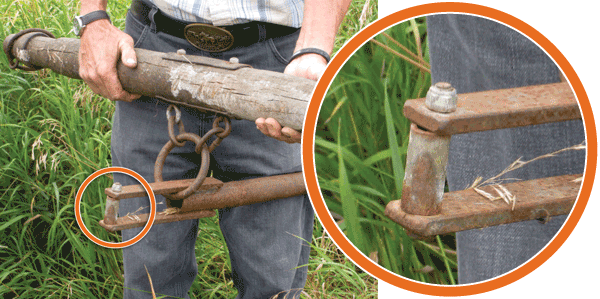
A good, safe neck yoke attachment to the pole. It may not be the prettiest but it’s the safest. A neck yoke should always be securely fastened to the pole.
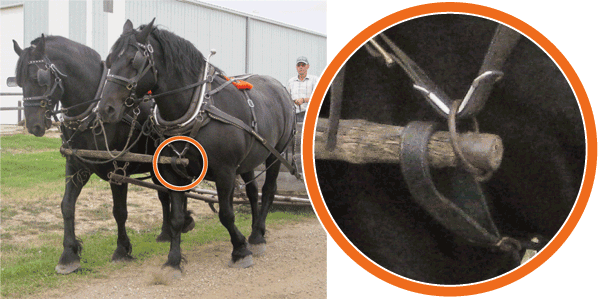
With the team hooked to a sled, this photo shows the martingale slipped over the neck yoke and that the yoke is pinned to the end of the pole. I also cross-tie the halter shanks to the opposite horse for parading or when driving young horses. A safety tip regarding driving lines: notice that the lines are buckled on the bits rather than using snaps. While perhaps more convenient, snaps have been known to fail at the most inopportune time.
Photos by Jan McDiarmid
Illustration courtesy Aaron Martin Harness Ltd., Wallenstein Ont.
Fred McDiarmid grew up driving horses on a dairy farm in Ont. He is now a semi-retired farmer and auctioneer at Veteran, Alta. He has been raising and driving Percherons for 25 years.