Fall Comfort Food

PUMPKIN CUPCAKES WITH SPICED CREAM CHEESE ICING

COURTESY CANOLA EAT WELL

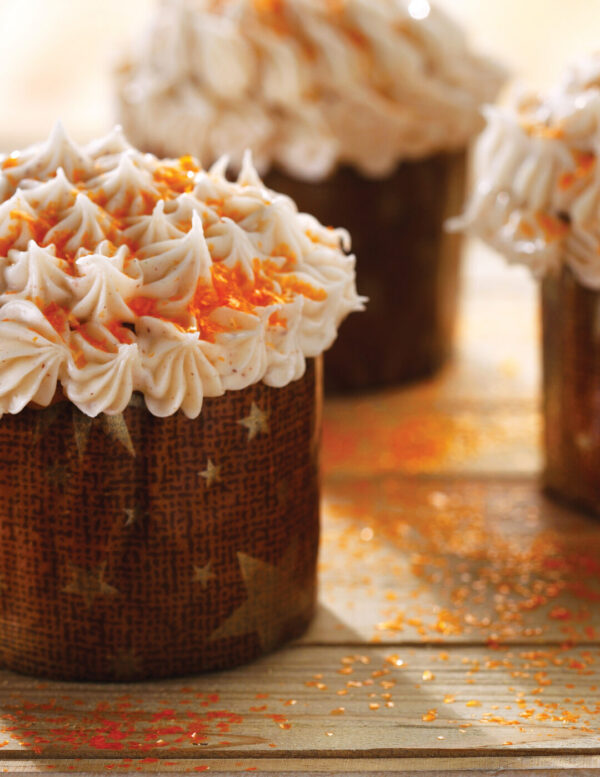
Fall in love with these seasonal cupcakes perfect for the cool autumn weather. The spicy tastes of cinnamon, ginger, nutmeg are combined with a pumpkin puree based batter in these Pumpkin Cupcakes and are made complete with a spiced cream cheese icing. Baking with canola oil has its health benefits. Canola oil is light, doesn’t interfere with other flavours and reduces the trans and saturated fats in your baking, making it a heart healthy choice.

INGREDIENTS

PUMPKIN CUPCAKES •1 ¾ cups all-purpose flour

• 1 tsp baking powder

• ¼ tsp baking soda

• 1 tsp cinnamon

• ½ tsp ground ginger

• ¼ tsp nutmeg

• ¼ tsp salt

• 1 cup brown sugar

• 1 /3 cup canola oil

• 2 eggs

• 1 tsp vanilla extract

• ¼ cup buttermilk

• 1 cup pureed pumpkin

SPICED CREAM CHEESE ICING

• 1 (8 oz) pkg cream cheese

• ¼ cup canola margarine

• 3 ½ – 4 cups confectioner’s sugar

• ½ tsp cinnamon

• ¼ tsp ground ginger

• ¼ tsp nutmeg

DIRECTIONS

PUMPKIN CUPCAKES

1. Line muffin pan with paper liners. Preheat oven to 350°F (180°C).

2. In medium bowl, combine flour, baking powder, baking soda, cinnamon, ginger, nutmeg and salt. Mix well. Set aside.

3. In large bowl, beat together brown sugar, canola oil and egg until thickened, about 2-3 minutes. Beat in vanilla. Add dry ingredients, buttermilk and pureed pumpkin to the wet ingredients. Beat until well combined, about 1 minute.

4. Divide cupcake batter into the paper lined muffin pan. Bake cupcakes for approximately 20 minutes or until toothpick inserted into the center of the cupcakes comes out clean. Remove cupcakes from pan and cool completely on wire rack.

5. Frost with Spiced Cream Cheese Frosting Icing. Recipe follows.

SPICED CREAM CHEESE ICING

1. In a large bowl, beat together the cream cheese and canola margarine until very smooth.

2. Add confectioner’s sugar, cinnamon, ginger, nutmeg and beat to combine ingredients. Adjust confectioner’s sugar or milk quantities if necessary.

Smokin’ Summer!

By Rob Tanner, Publisher Canadian Cowboy Country Magazine


As I sit down to write this, the snow is receding, the grass is greening up, and calving is in full swing. I cannot tell you how happy I am, as spring always brings with it renewed optimism and hope for better times ahead. Particularly this year as we start to come out of our on-again-off-again lockdowns. With more home time this past year, I finally got around to reading more, putzing around the farm more, and, thanks to Terri, was introduced to the Joe Pickett series. Above all else, I was introduced to wood-fired grilling and was hooked.


Every spring, I look forward to re-honing my BBQ skills and amazing everyone with a new season of taste sensations — at least in my mind. After close to 40 years of mastering a gas BBQ, I was surprised to find wood-fired grills are not only gaining ground but are highly-touted as the “ultimate grilling experience.” What intrigued me most was that wonderful quest for the perfect smoke ring and fall-apart tenderness.

There are many choices in wood-fired grills today, but after looking them over, I decided that this summer, cooking would be done with the Traeger Ironwood 650. Why? They are the original; I like the construction details, the close-it-and-forget-it method and the Wi-Fire™ technology. This app allows me to check and adjust temperatures from my office or in the field, knowing I would have a perfect meal when I returned home — or at least that is the promise.

Once the grill was delivered, we tore into the box and started assembly. Instructions were clear, and in no time flat, we had it assembled and ready to fire up. Best yet, we downloaded the Traeger app and found it was comprehensive and so easy to follow. The app included clear video instructions on grill assembly and detailed recipes that allow even a novice to serve up great results.

Gearing up for a full season of grilling, we decided to go to town and buy a few different types of pellets, Traeger spices and sauce. (see sidebar for pellet chart). We planned for short ribs and chicken wings but decided to go to our own grassfed, hormone-free beef for our first smoker session. We could easily compare the process and taste as we have years of BBQ experience.

Ironically Port Butts are not from the back end, but rather are from the shoulder. Why? Around the time of the Revolutionary War, the barrels that pork used to be stored in were called butts, and the name stuck!
Photo courtesy Darrel Seskin, CBBQS Member

After we seasoned the grill as per instructions, we were ready. We filled the hopper with pellets, prepped the roast with Traeger seasoning, and we were underway. The Wi-Fire technology is awesome! Once the lid was closed, we could completely monitor progress through my smartphone. Grill temperature, internal meat temperature, countdown timer, pellets remaining status, turn on “super smoke,” keep warm or manually adjust the temperature (or leave it on automatic), and finally, shut down at the end.

We were thrilled when we cut into the roast and first saw the smoke ring. My quest was over — there it was! The meal was wonderful; the beef was super tender and a hit at the family dinner.

Wish me luck on my quest for the perfect smoke ring and wood-fired grilling experience this summer. While I will focus on beef — chicken, pork, bison, salmon and wild game will also play a role. I will be keeping notes, and this fall will return with my favourite recipes, plus a comprehensive review of what worked best for us and what did not.

If you have some favourite smoker recipes or tips, please share them with me at rob@cowboycountrymagazine.com.

For great grilling and smoker recipes check out traegergrills.com

Best Eggnog Cheesecake!

Adapted from Taste of Home


Base

1 cup graham cracker crumbs (variation: try half graham crumbs & half crushed gingersnaps)

2 tbsp. sugar

3 tbsp. butter, melted

Filling

3 packages (8 ounces each) cream cheese, softened

1 cup sugar

3 tbsp. all-purpose flour

2 large eggs, room temperature, lightly beaten

3/4 cup eggnog

1 tsp. amber or spiced rum

Dash ground nutmeg & cinnamon

Whipped cream & additional ground nutmeg, optional

Preheat oven to 325° F.

Wrap greased 9″ springform pan with double thickness of heavy-duty foil (about 18″ square). Secure foil around pan.

For the Base: Combine cracker crumbs, sugar and melted butter. Press into the bottom of pan. Bake at 325°F for 10 minutes and cool on a wire rack.

For the Filling: Beat cream cheese, sugar and floor in a large bowl until smooth. Add eggs; beat on low speed just until combined. Gradually stir in the eggnog, rum, nutmeg and cinnamon. Pour filling over crust.

Place foil wrapped springform pan in a larger baking pan; add 1″ of hot water to larger pan.

Bake at 325°F for about 45–50 minutes, until centre is just set and top appears dull. Remove springform pan from water bath. Cool on a wire rack for 10 minutes. Loosen sides from pan with a knife; cool 1 hour longer. Refrigerate overnight, covering when completely cooled. If desired, top with whipped cream, then sprinkle with nutmeg.


28

Chuckwagon Biscuits

Lauren Hitchner – Hitchner Quarter Horses, Longview, Alberta

Lauren’s mother, who was born in eastern Colorado in 1902, swears this recipe was popular on the wagon trains and with many chuckwagon cooks. The biscuits are tender and moist when fresh, yet durable enough to travel in saddle bags.

MAKES 2 DOZEN BISCUITS

1 package active dry yeast
2-1/2 tbsp warm water
3-1/4 cups unsifted all-purpose flour
2-1/4 tsp baking powder
1/8 tsp baking soda
1 tbsp sugar
½ tsp salt
½ cup shortening
1 cup buttermilk
melted butter

~ Dissolve yeast in warm water and set aside. Sift flour, baking powder, baking soda, sugar and salt. Cut in shortening. Add buttermilk to yeast mixture. Combine yeast and flour mixtures, kneading slightly.

~ Roll out to ½ inch thickness and cut with a 2-1/4 inch biscuit cutter. Place on a greased baking sheet and brush lightly with melted butter. Let rise 30 minutes. Bake in 350° oven for 25 to 30 minutes.

Western Hash

Bill and Patricia Dunn Mosquito Creek Ranch, Cayley, Alberta

Every rancher needs at least a hundred recipes that use ground beef.  Here’s another one!


SERVES 4 to 6

1 to 1-12 lbs ground beef
1 medium onion, chopped
1 28 oz can tomatoes
1/2 cup celery or green pepper, chopped
½ cup raw rice
salt, pepper, oregano, basil to taste
1 14 oz can kernel corn, drained (optional)
1 14 oz can mushrooms, drained (optional)
Cheddar or processed cheese (optional)

Brown the beef. Add onions, tomatoes, celery or green pepper, rice and seasonings. Simmer 20 minutes, or until rice is tender. Add corn and mushrooms, if desired, and adjust seasonings. This is good served right out of a frying pan or piled into a casserole dish and topped with Cheddar or processed cheese.